These were a new holiday treat recipe I wanted to try this year and they will remain on my baking list every year...these prompted Aislynn to claim that I am the best cook ever, ha! They were sooooo delicious that they barely lasted 24 hours here:) Check out the recipe here and I followed the reviews and baked for exactly 11 minutes=perfection.
Monday, December 13, 2010
chewy molasses spice cookies
These were a new holiday treat recipe I wanted to try this year and they will remain on my baking list every year...these prompted Aislynn to claim that I am the best cook ever, ha! They were sooooo delicious that they barely lasted 24 hours here:) Check out the recipe here and I followed the reviews and baked for exactly 11 minutes=perfection.Wednesday, December 8, 2010
a yummy, super easy chicken recipe
 We have been back in town awhile, but with all the laundry, getting back in the routine, decorating for Christmas...this ole blog has been neglected. Whenever we get back in town or if we have been eating out too much and want to start cooking more, I have certain recipes that are easy and quick that I always start with. I wanted to try something new and saw this recipe on Baked Bree and it looked simple enough so I decided to try it. It was amazing, even Kieran ate it and Aislynn said it was her favorite thing I have made, ha ha! I can't get Bree's site t pull up to link the recipe, so here it is here:
Kelly's Overnight Chicken
Ingredients:
1 tbsp curry powder
4 tbsp soy sauce
1/3 cup Dijon mustard
1/2 cup honey
4 chicken breasts
1. Mix the curry powder, soy sauce, Dijon mustard, and honey in a bowl.
2. Place chicken breasts in glass container or plastic Ziploc bag and pour marinade over the chicken. Seal and place in refrigerator overnight.
3. The next day, place chicken with sauce in baking dish and cover with foil. Bake at 350 degrees for one hour. Take out, uncover, baste chicken and bake for 15 more minutes.
4. Ta da! I poured some of the sauce in my rice to flavor it and served it with green beans. Yum yum yum and so super easy:) This is definitely getting added in to my dinner rotation.
Wednesday, November 24, 2010
Happy Thanksgiving!
Off to my in-laws for turkey day and then to Disney World:) When I get back...get ready for LOTS of fun...Christmas time-YAY!
Monday, November 22, 2010
how to make an advent calendar
Finally typing up this tutorial on how I made my advent calendar. When I saw this advent calendar from The Land of Nod, I thought I could make one similar. So here goes in my attempt to tell you how I put it together:)
***
Supplies:
2 pieces of muslin 12.75 inches x 16.75 inches
1 piece of thin cotton batting 12.75 inches x 16.25 inches
enough felt (use whatever colors you wish) to cut 24 2.25 inches x 2 inches pieces + the numbers for the pockets (I ordered this felt from this shop and the quality rocks and 10 pieces is plenty for this project!)
about 8 inches of ribbon
basic sewing supplies
Instructions:
 Step 1: Cut 24 pieces of felt squares that measure 2.25 inches x 2 inches.
 Step 2: Trace numbers 1-24 onto felt and cut them out. You could print off the numbers from word and cut them out and trace them, in the font and size you like, or you can dig through your scrapbook stash like me and find some chipboard numbers that are the right size. I used this chipboard alphabet set from Pink Paislee.
 Step 3: Press your muslin and batting. *I do this before cutting my fabrics to size, to ensure the correct sizes:)
 Step 4: Layer your 2 pieces of muslin with the batting ON THE BOTTOM (not in between the 2 pieces of muslin). Pin 3 sides together, leaving the side where the batting doesn't reach the end unpinned.
 Step 5: Top stitch the 3 sides that are pinned, leaving a 1/2" seam allowance. Make sure you back stitch at the ends to reinforce the seam.
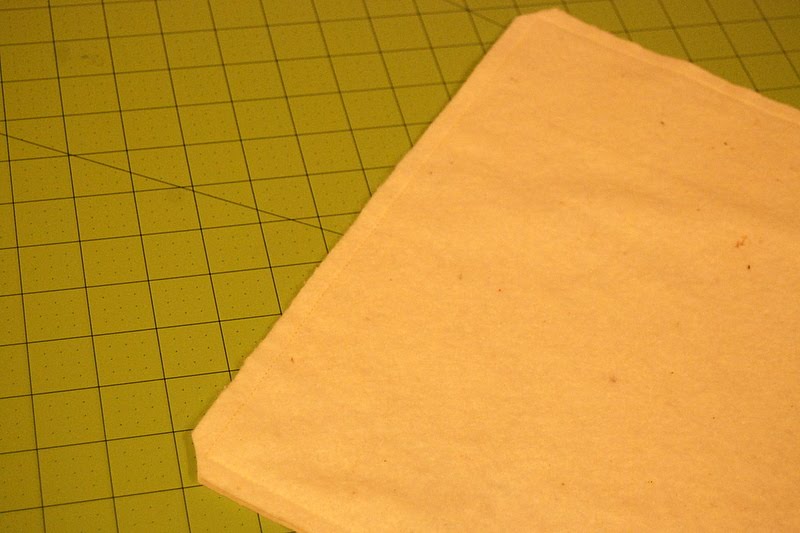 Step 6: Clip the top 2 corners (not the open end) and turn inside out so that the batting is in between the 2 pieces of muslin. Poke out the corners with a bone folder, then press your rectangle.
 Step 7: Fold in the open pieces of muslin 1/2" and pin together. Press.
 Step 8: Pin the ends of the ribbon (to make a loop) about 1/2" in between the 2 pieces of muslin. Do this on the open end you just pressed, in the middle of the calendar. Top stitch all the way around your calendar with a 1/4"seam allowance, back stitching at the start and stop points.
 Step 9: Place your felt squares on the calendar in whatever pattern is pleasing to you and pin down. Make sure the longer side is running horizontal with your calendar.
 Step 10: Top stitch your pockets on. Only stitch 3 sides, making sure the top part (remember that the ribbon is the top of the calendar) is open.
 Step 11: Lay your numbers on the sewn pockets.
 Step 12: Glue on the numbers with tacky glue or felt/fabric glue. You COULD have sewn on your numbers on the pockets before you sewed on the pockets, but I went the easier route, plus I already had sewn on my pockets when I realized that if I sewed on the numbers I wouldn't be able to open the pockets. Duh. This is what happens when you are a very novice sewer and are making something up as you go along. And when it is about 2 hours past your bedtime:)
 Ta Da! You are done! You could of course change the measurements to your desired size. As you can see, the candy cane is a little tall for the pockets:) I plan to go a teeny bit healthier route and buy snacks I normally don't buy, like yogurt covered raisins, pretzels, and fruit strips with the occasional sweet thrown in:)
Oh, and sorry the colors are so off here...I was sneaking in time whenever I could to do this, so I couldn't be picky with the light:)
Sunday, November 21, 2010
the simple things
 playing Chutes and Ladders with my girl. She has got to be the unluckiest Chutes and Ladders player ever...I win every time. Weird, huh? Also, love her little pinky sticking up...she does this when she moves all the playing pieces no matter what game we are playing:)
***
Click HERE to read more about The Simple Things photography challenge by Rebecca Cooper.
Saturday, November 20, 2010
sketchy saturdays
I am trying something new. I got the disk with the December issue of Creating Keepsakes that has 50 bonus sketches on it, so I thought it would be fun to try one every so often (on Saturdays....just for a clever blog title, hee hee). I figure this will be an easy way to at least get some quick scrappy pages in...even though sometimes I start with a sketch and the page takes me just as long as starting from scratch:)
Here is Sketch #1 from the disk:
Here is Sketch #1 from the disk:
 And my take:
 I opted to combine the pages to make it a one pager+make it an 8.5x11 page, but besides that, I think you can clearly tell it is based on this sketch. I really like how this layout came together:)
Here are some close up shots of the page:

 Want to make a layout based on this sketch? Please share and link your page here!
***
Friday, November 19, 2010
a fun turkey craft
 I was searching for an easy craft to do when Aislynn got home from school and I found this turkey headband (or hat as Kieran called it!). It took no time and I almost guarantee you have the supplies on hand...unless your construction paper pack didn't come with brown paper like mine and you have to raid your scrapbook stash for cardstock. What's up with that Crayola? You put 2 shades of blue and no brown? Hmph...
***
Finished my advent calendar and it looks super cute, just gotta get a good picture of it:)
Subscribe to:
Posts (Atom)