Showing posts with label halloween. Show all posts

Thursday, October 28, 2010

candy corn parfaits

These are ready to go to Aislynn's Halloween party at school tomorrow. Aren't they adorable? I wanted to do something different besides the typical cookie/cupcake and when I saw these on the Baked Bree blog, I knew I wanted to make them! They were super easy, I wish could have gotten a better picture of them.
Check out the steps HERE and while you are there, look around. She had some gorgeous food pictures and awesome recipes! I made the Baked Potato Soup a few weeks ago and it was ridiculously good!! The macaroni and cheese was tasty too:)

Wednesday, October 27, 2010

Princess Leia costume and a candy tote bag

Aislynn is going to be Princess Leia this year for Halloween, so I ambitiously decided to make her costume. At first I bit off WAAAY more than I could chew. You see, I have never made anything with a commercial pattern or sewn with a knit fabric. This was so tricky. I used Simplicity Costume Pattern 2845 and the fabric I chose was a poly/cotton blend (the ponte knit fabric from Joann's). I used the angel version and left off the gold trim. For the belt, I measured how long it needed to be, added velcro and then sewed grey felt shapes on the front center. I got to a point in making this, and couldn't understand the pattern instructions so I just made up my own way how to do it (the sleeves were the worst part). All in all, I am satisfied how it came out (especially considering at one point I was going to toss it and just buy one). I will post a better picture of her wearing it when Halloween comes along in a few days. I am going to do her hair and she is going to wear a white turtleneck, white tights and white shoes underneath it.
I am such a novice in my sewing adventure and am happy this came out wearable. I love how every time I do a new project I learn something new and I am a teeny tiny bit closer to actually becoming a sewer and learning to sew straight:P
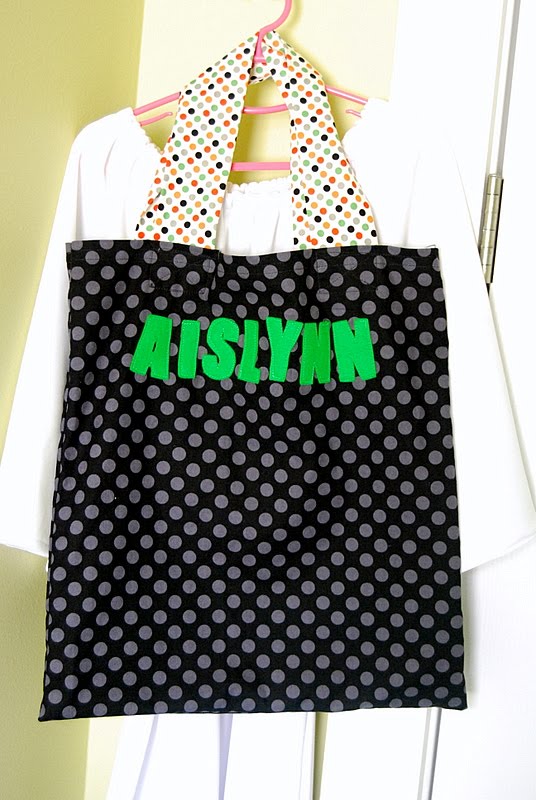
I also made her this tote bag and sewed felt letters on it to personalize it. Now she has somewhere to store her yummy treats that Mommy surely won't sneak in here and get some;) I used a pattern/instructions from an online class, but if you google-there are many places to tell you how to make a tote bag. Here is a good link: 35 Reusable Grocery Bags.

Thursday, October 21, 2010

foot ghost + bonus tutorial

Aislynn made this project in school last week, and I decided to make one for the little guy. This is great for those of you with teeny tiny ones who just can't wait to start crafting with their kids:)

Supplies needed:
  • white paint
  • scrap of black construction paper/cardstock
  • baker's twine or skinny ribbon for bow-tie
  • googly eyes
  • black marker or non-toxic black inkStep 1: Obtain a cute baby foot:)Step 2: Paint the bottom of it with the white paint.
Step 3: "Stamp" the black cardstock with the cute baby foot.
It's okay if they have wriggly toes:)
Step 4: Let the footprint dry and then cut it out.
Step 5: Add googly eyes:)
Step 6: Cut 2 teeny slits (one of each side) for the bow-tie.
Step 7: Add the baker's twine and tie a bow at the neck of your ghost.
Step 8: In hindsight, I would have stamped his thumbprint for the mouth, using non-toxic black ink, but instead I drew a mouth with a black marker.
Step 9: Make a loop with some baker's twine and tape the ends down to the back of your ghost so you can hang it. I wrote his name and age down on the back too:)
Hang it up and enjoy!

*Bonus Tutorial*
My friend Shel was wondering how I made the Halloween banner pictured (kinda!) above. I can't tell you exactly because the fabric/felt parts were created using class project instructions and that was part of the class agreement, *but* I will tell you how to make a similar banner using paper supplies:)

Supplies needed:
  • patterned paper
  • cardstock (I used bingo cards from Jenni Bowlin)
  • ribbon
  • alphabet stickers/chipboard
  • decorative edge scissors
  • embellishments (optional)
Instructions:
  1. Using a circle cutter or hand-cutting, cut circles in desired size from the patterned paper.
  2. Cut out circles slightly larger from cardstock, trim with decorative edge scissors.
  3. Cut how much ribbon you need for the banner. *Make sure you leave room on the edges for hanging!
  4. Lay the ribbon out on a table or flat surface. Slip the cardstock circles underneath the ribbon in desired spots of banner.
  5. Add adhesive to the back of the patterned paper circle and place in the center of the cardstock circle. Press and smooth down so the ribbon gets sandwiched in between both papers.
  6. Add alphabet letters to the circles to spell what you want to spell.
  7. If you like, add some embellishments to the circles/ribbon to make it more festive.
Hang up and enjoy:)

Sunday, October 17, 2010

kid's craft: candle holders


I was inspired from this project to adapt the idea to make these Halloween-y (don't you love adding y's to the end of words to make new ones?) lanterns. They look awesome when lit and Aislynn really enjoyed making these, she was pretty much able to do the whole thing herself (we did the orange one together first).

Here's what you need to make these:
  • a hurricane candle holder in whatever size you wish
  • colored tissue paper in desired colors
  • liquid glue that will dry clear (we used Elmer's white glue), paintbrush
  • candles to go in holder
and here's how:
  1. Tear up the tissue paper into small pieces.
  2. Mix the glue with a little water to make a thin to medium consistency.
  3. Paint the outside of the candle holder with the glue mixture, cover with pieces of the tissue paper (do small spots at a time so the glue doesn't dry on you).
  4. When you have the candle holder covered, paint over the tissue paper with the glue mixture.
  5. Let dry completely, place candle in holder and light~spooky!!!
Hope everyone had a great weekend:)
Coming this week: bread, more Halloween craft tutorials, and more!

Tuesday, October 12, 2010

halloween canvases

My 5 year old, Aislynn, and I made these canvases Saturday afternoon and I thought I would share because they are super easy and really cute:)
For Frankenstein, we used a 5x7 canvas and painted it green. When it was dry, we went through my cardstock scraps and punched a green nose with a 1" punch. Then we made eyes with white and black cardstock using a 1.5" and a 1" punch. We used my 2" square punch for the ears and glued them onto the back of the canvas. Then we used some more black scraps and cut the edge with decorative edge scissors for his hair. Finally, we cut some yarn for his mouth and eyebrows and glued them on. Viola!
The pumpkin was made on an 8x10 canvas that we covered with black paint. Then going through my cardstock scraps again, we cut out tiny pieces from orange and green. We drew a pumpkin with a white crayon just so we had an idea of where to put the paper. When we glued everything down, we added glitter here and there just to add a little extra! This was Aislynn's favorite of the two, although I am partial to Franky:)
I love how they look on our shelves!
P.S. Coming soon...how we made the hurricane candle holders you see there-they look so cool lit and this was a BIG hit with Aislynn.
Related Posts Plugin for WordPress, Blogger...